
BLOCKS: Announcement Block
Announcements Block
The Announcements Block allows you to display important messages directly on a Dashboard inside your Portal.
Announcements are commonly used to share updates, reminders, news, or instructions with your users. Each user will only see the announcements that are relevant to them based on how the announcement was targeted.
For example, you can display announcements for:
- A specific Role
- A Circle
- A Team
- A Company
- An Individual Contact
This ensures that each user only sees the information intended for them.
Note: The Announcements Block can only be added to a Dashboard page.
What Users Will See
When the block is displayed on a Dashboard, the user will see:
- A list of announcements relevant to them
- The announcement title and message
- Any active announcements targeted to their Role, Circle, Team, Company, or individual account
If no announcements are available for that user, the block will simply appear empty.
How to add an Announcements Block to a Dashboard
Follow these steps to add the Announcements Block:
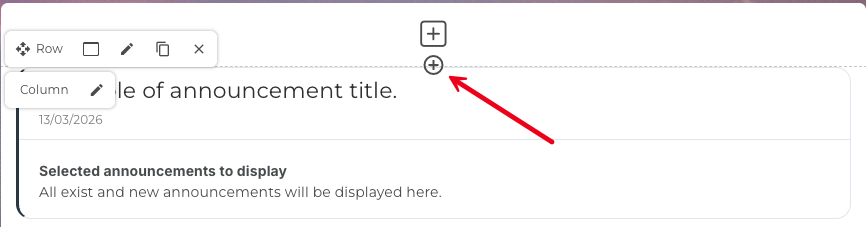
- Navigate to the Dashboard you want to edit.
- Open the Content Block Editor.
- Click the ➕ Add Block button.
- Select Announcements Block from the list of available blocks.
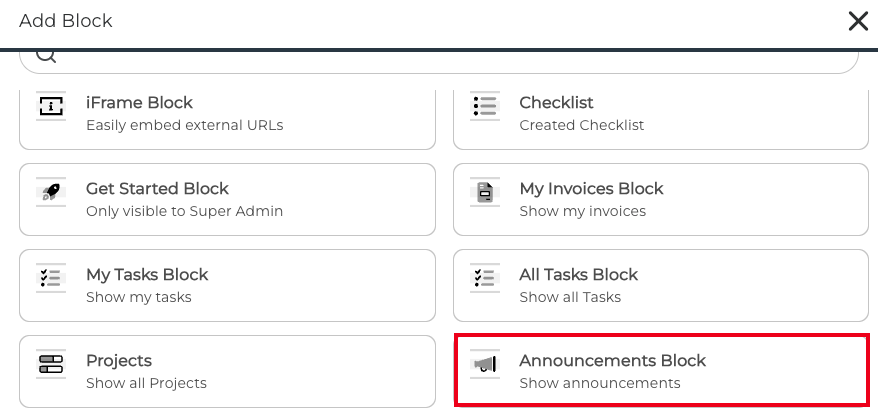
- The block will now appear on the page.


You can reposition the block by dragging it to the desired location within your Dashboard layout.
Editing the Announcements Block
To modify the block settings:
- Hover over the Announcements Block.
- Click the Edit (pencil icon) in the block toolbar.
- Adjust the available settings.

Common options may include:
- Block Options – Choose your individual Announcement or click 'Select All'. By selecting ALL it will display all of the current Announcements and future Announcements.
- Style Options - you can choose to style the boarder, background and text. Additional CSS can be added if required.
- Access Options – Control which users can see the block.
Once finished, click Save.
Creating Announcements to display
The Announcements Block will only show announcements that you have already created.
To create an announcement:
1. Navigate to Announcements in the platform by clicking Content>Announcements

2. Click the + ADD ANNOUNCEMENT button.
3. Enter the Title and Announcement Message.

4. Choose if you would like to make it sticky! Checking this box will "pin" the Announcement, which will keep it at the top of the Announcement list. By default, Announcements are arranged by date with the newest at the top. If you have multiple Announcements stickied, you can arrange them using the arrows that appear when you hover over the particular Announcement.

5. Now, in Access, add the Target Audience (Role, Circle, Team, Company, or Individual) that you want the Announcement to be shown to. This can be set for one or multiple recipients or Roles.
6. Click Save.
Once published, the announcement will automatically appear in the Announcements Block for the users it applies to.
Best Practices
To make announcements effective:
- Keep messages short and clear
- Use announcements for important updates only
- Target announcements to the correct audience to avoid clutter
- Remove or expire announcements once they are no longer relevant
✅ Tip: Many businesses use the Announcements Block to highlight onboarding instructions, maintenance notices, upcoming deadlines, or new portal features.
Tips for using the Announcements Block
- Keep it visible: Place the Announcements Block near the top of your Dashboard so users see important notices as soon as they log in.
- Target the Announcement: Target announcements to the correct audience to avoid clutter.
- Combine with other blocks: Pair the Announcements Block with a Welcome Block and an Upload Block on the same Dashboard to create a complete, professional client landing page.
- Keep announcements current: Use announcements for important updates only
Regularly review and archive older announcements so the block does not become cluttered with outdated information.
RELATED ARTICLES
CLICK HERE to learn about the Content Block Editor
CLICK HERE to learn about creating and managing Announcements
CLICK HERE to learn about Roles and Circles