
PROJECTS: Tasks
What is a Task?
A Task is an assigned job to a user in the platform. You can create Tasks that are not associated with a Project, and they can be assigned to both Staff Members and Contacts.
IMPORTANT: Tasks cannot be assigned to Leads, Prospects, or Office Managers.
In relation to a Project, Tasks are the steps that need to be completed within your Project.
CLICK HERE to learn more about creating a Project
How do I create a Task?
There are several ways to create a Task, depending on the user's Role and the purpose of the Task.
All Tasks
As a Super Admin, Admin, or Project Manager, you can create a Task by navigating to Projects > All Tasks and clicking +Add Task.
You will be able to specify the user to assign it to, as well as the Project if necessary.

TIP: In All Tasks you can directly create a Task and choose a Client without having to select a Project first. This option is not available when creating a new Task in My Tasks.
My Tasks
Users can create Tasks assigned to themselves by navigating to Projects > My Tasks and clicking +Add Task.
They will be able to specify the Project if necessary.  Users can also create Tasks within a Project. Navigate to Projects > Projects and select the name of your desired Project.
Alternatively, you can also click the Options menu button (3 dots) and choose Manage.
 Click Tasks in the top navigation menu bar. Then, click the +Add Task button.
 This method will automatically associate the Task with the Project.
My Calendar
Users can navigate to Calendar > My Calendar and simply click on the date they would like to make the Due Date of a Task.

Creating the Task

Assigned To: Use this field to assign the desired user to the Task. Only users who are assigned to the Project itself will be displayed in this field, and only certain user Roles.
If you choose to assign a Task to a Client, an additional checkbox to require Client approval will appear next to the Assign field.
Project: If the Task is not being created within a Project, you will be able to choose a Project from the dropdown menu.
Title: This will be the name of the Task, which will be displayed in various places throughout the installation. All users who are able to view a Task will be able to see the title.
Est Time: The number of hours that you anticipate the Task will take to complete.
Time Spent: The numbers of hours spent completing a Task.
Description: You can include a description with a standard WYSIWYG editor. All users who are able to view a Task will be able to see the description.

Tags: Tags can be custom text labels that you can use to organize your Tasks. You can add multiple Tags to a Task by separating them using commas. Once a Tag has been created, it can be used in the filters of the Task list to easily locate the desired Tasks.
Priority: Use this field to set the desired priority for the Task. By default, the priority will be set to “Normal”. The selected priority will determine what color the Task is tagged with in the Tasks table, as well as affect sorting of the Tasks using filters. All users who are able to view a Task will be able to see the priority.
Type: You can set a Type for the Task.
CLICK HERE to learn about Content Categories
Status: Use this field to set the Status of the Task. Note: certain actions you take will automatically change the Status (such as marking a task as "Complete").
Phase: Use this field to optionally assign the Task to a pre-existing Phase.
CLICK HERE to learn more about Phases

Followers: If a user is set as a Follower in a Task, they will be able to view the Task and will receive standard notifications related to the Task. However, they will not be the "Assignee" of the Task. Additionally, the Task will not appear in their My Tasks list.
Start Date: Designate the beginning date of the Task.
Due Date: Set a goal for when the Task is to be complete. All users who are able to view a Task will be able to see the due date.
TIP: Followers set to a Recurring Task will be included in all future Tasks.
Task Dependency

There are two types of Task Dependency; prevention of editing, or hide the Task.

For each type, you will need to specify a different Task within the Project that the dependency is based on, as well as its Designated Status. Once this specified Task has been set to this Status, the Task you are creating will trigger the appropriate action (it will either have its editing enabled, or it will be unhidden).
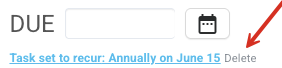
Task Recurrence
 To set the Task as Recurring, click the Recurring Task button and set how often the Task recurs, for how long, and when it starts.
When the first task generates it will show the Blueprint icon so you can see the original task.
 If you need to cancel the recurrence, you can do so by returning to the BluePrint Task and
Click Delete next to the recurring details within the task.
How do I create a Subtask?
If you would like to break down a Task into smaller, more manageable segments, you can create Subtasks. This feature allows you to divide a Task into smaller portions, helping the assigned user to more effectively manage their time and assigned work.
To create a Subtask, start by clicking on the Task in the list view. Alternatively, you can click the Options menu button on a Task and choose View.
Click the icon indicated in the screenshot below. Hovering your cursor over this icon will display the text Create/Show Subtasks.

A new pane will appear underneath the Task Description text field. Creating a new Subtask is similar to creating a "to-do list". Enter text into the field and press Enter; it will add the Subtasks as a checklist. Once created, you can check the boxes to mark each Subtask as complete. To delete a Subtask, click the red to the right.

How do I manage Tasks?
Once a Task is created, you can perform various actions using the Options menu button (3 dots) from the Tasks list view.
 View: View the details of the Task.
Edit: Edit any settings and details, including the Status.
Complete: Change the status of the Task to Completed; this will remove it from the normal Task list view. The Status of a Task can be changed at any time.
Duplicate: Use this option to quickly create a new Task that is a copy of the existing Task.
Manage Automations: You can assign Automations to trigger when this Task is set to "Complete" status.
Manage Files: You can upload files directly to the Task. Files that are uploaded from this page will automatically be accessible to the assignee of the Task itself. These Files will also be visible (to the user who is assigned to the Task) from the main Files dashboard.
Delete: Completely remove the Task. Note: This cannot be undone.
Invoice: You have the option of converting each Task to an Invoice Item, in a similar manner to converting Timers to Invoice Items.
You can choose to add the Task as an Item to either a New Invoice, Existing Invoice, New Accumulating Generator, or Existing Accumulating Generator.

Once you make your selection, you will be directed to the edit Invoice/Generator page where you can set the desired rate and quantity for the newly added Items.
CLICK HERE to learn about Billing
IMPORTANT: After a Task has been added to an Invoice or Accumulating Generator, it will no longer be available to be added to an Invoice or Accumulating Generator.
How do I Bulk Edit Tasks?
In the List View of All Tasks, My Tasks, and Tasks (within a Project), you can Bulk Edit certain details all at once.
Check the boxes of the Tasks you would like to edit, and click the Make a selection field at the bottom of the List View screen. Select Edit.
 Now you can change the Assignee, Priority, Task Type, Task Status, Phase, and Due Date for all selected Tasks.

You can also specify the Followers for the Tasks.
CLICK HERE to learn about Task Followers and Comments