
OFFICE: Proposals & Proposal Generators
What is a Proposal?
A Proposal is a document presenting an outline that plans out every step of a Project to ensure that it meets your Contact's needs. Your Contact receives the Proposal and can either Approve the Proposal, by signing it, or they can Reject it.
You can also create Proposal Generators! Proposal Generators are not assigned to anyone, but rather, they are a mechanism that lets you pre-create and pre-configure details/content and save all of that as part of a Proposal Generator that can be referenced in an Automation and then triggered on the fly as a part of that Automation. When a Proposal Generator is triggered, the result is that it generates a Direct Proposal that is assigned directly to the Target of the Automation.
How do I create a Proposal?
Navigate to Office > Proposals, and click +Add Proposal.


Direct Proposal
Begin by filling out the required fields.

Assign Proposal to: Choose a Contact or Circle from the dropdown menu. An individual Proposal will be generated for each Contact if you select more than one.
 Proposal Title / Reference Name: The Contact will see this Title at the top of their Proposal.
Valid Until: The Proposal will expire and cannot be accepted after this date.
Select Proposal Value Source: Choose between Static Value or Proposal Options Block Value. Static value will require a Value and Currency setting on the invoice. The Proposal Options Block Value will require you to add the Items and Add-Ons or Package options for the Client to choose from (see below).
If choose to give your Clients options to choose from change the Proposal Value Source and then click the Configure Proposal Options Block to add your options.

Value: This is the monetary amount for the Proposal required to convert it into an Invoice or Estimate.
Currency: The currency of the proposed value.
Proposal Generator
Creating a Proposal Generator is very similar to creating a Direct Proposal, with two minor differences.
You won't have the option to assign a Contact or Circle - instead, this will be done as part of the automation trigger process.
 For the Valid Until fields, instead of choosing a specific date, you will choose a "relative" date This means that once the Proposal Generator has been triggered and the Proposal has been generated, that day will be the starting point.
For example, if you set Valid Until "1 Week" the timer for that week will not start until the Proposal is generated. You could create a Proposal Generator in March but trigger it in April, and the countdown will begin on that day in April.
Creating the Pages
By default, the Accept & Sign and Thank You Pages will already be in place.
If you have specified text in these pages in Settings it will be pre-populated.
CLICK HERE to learn about Proposal Settings

Click Add a Blank Page to add a new page. You can click add from Page Templates to add a Page from your Page Templates.
CLICK HERE to learn about Proposal Page Templates
You can add content to the page using the Content Block Editor. This is the same building tool used in Dashboards and Portal Pages however the Proposal Content Block Editor also has the additional Proposal Choice Block.
CLICK HERE to learn about the Content Block Editor
 To insert Dynamic Data Placeholders, click the {x} button in a Text Block.

CLICK HERE to learn about Placeholders
Click the icon to open or close the Page. You can use the dropdown menu to Edit the Title, Delete the page, or Save to Library.

To reorder the pages, click the icon and drag it into place. The Accept & Sign and Thank You pages cannot be moved.
The Proposal Choice Block will enable you to add Proposal Options for the Target to select.
To add a Proposal Block you must change the Proposal Value Source from Static Value to Proposal Options Block Value. If you don't change the Proposal Value Source you will see this window when adding the Proposal Choice Block.


This will then show a 'Configure Proposal Options' button. Click the button to configure the Proposal Options and choose your currency and offer type.
If you choose Items & Add-ons any Items and Add-ons will be available for you to add from the Items dropdown box. You can also limit the amount of Items and Add-ons that the Target can select.

If the Offer Type you choose is Packages the other options will change to be Package related. You can then add the Package options you would like to offer and also limit the number of packages the target can select if required.

Once you have added your desired options, you can use the two line next to each option to drag and drop your Items and Add-ons or Packages into your preferred order;

What will the Target see?
The Target will see the Items & Add-ons or Packages you have added and they can tick the options they would like.

As the options are ticked, the total will calculate automatically.
Preview Mode
To preview the Proposal and see additional options, click the icon shown below.
 A preview of the Proposal will be shown. In this mode, you will have additional tabs to configure your Proposal.
To customize the color, font, and logo, click the icon shown below.
 A customization panel will appear in which your edits will appear in real-time.

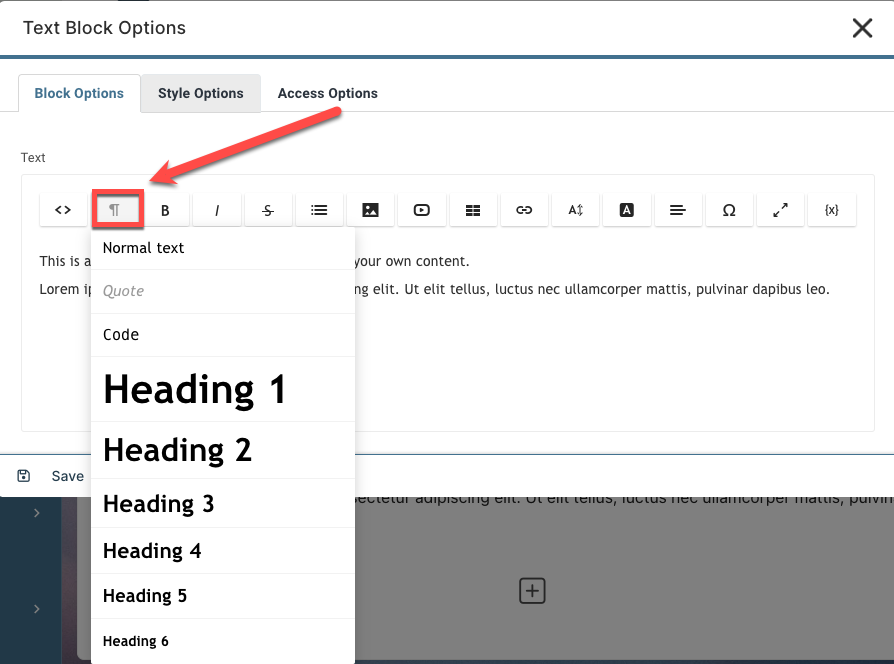
How do I Style Text?
You can choose the text/heading type by clicking the below icon in the text block
Now go to the sidebar and click the Text Icon to add your preferred Font details;

Choose from the list of Google Fonts and select the size, color, weight and letter spacing.
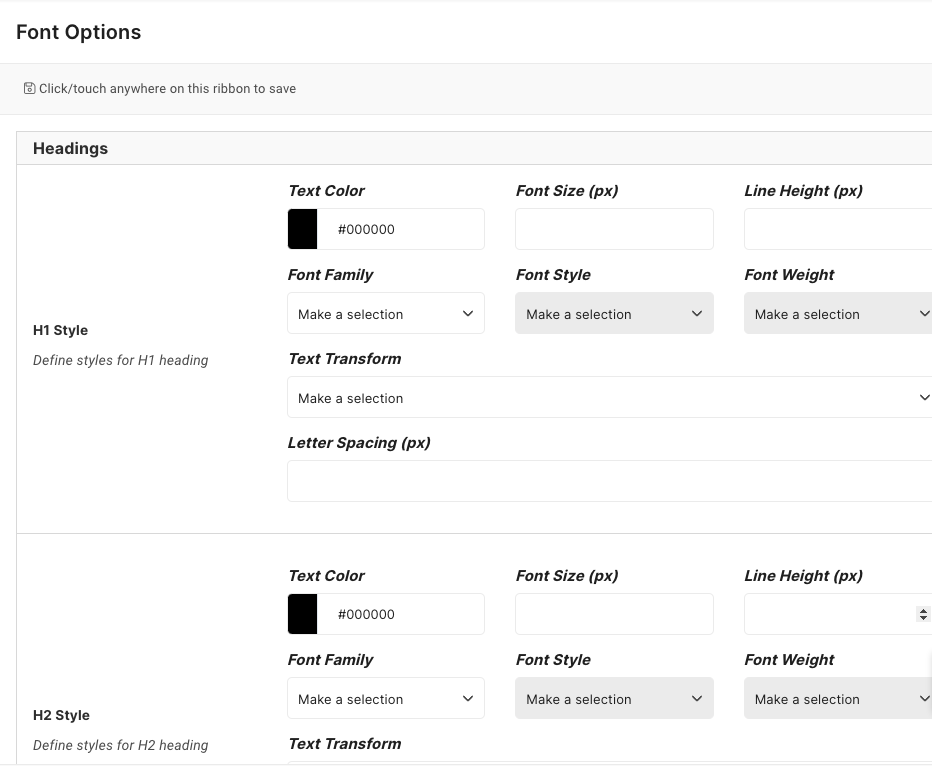
Please note, you can check your Text/Font by clicking Preview. The Font Styling is not visible when editing.
Notification Settings
To configure Notification Settings, click the icon shown below.
 A Notifications panel will appear in which you can set your preferences.
You can configure Notification Settings for when the Proposal is viewed and signed. Choose a Staff Member from the dropdown menu for each field. You can select multiple users or click 'All Staff' to notify the entire Staff Team.
You can also set two email reminders for when the Proposal is close to expiring and send an internal notification to staff members when the Proposal is signed or rejected.

Assigning Automations
To assign Automations to your Proposal click the icon shown below.

A No-Code Automations panel will appear in which you can configure them by clicking +Configure Automations. You can trigger two sets of Automations. One for an Approved Proposal and another for a Rejected Proposal.

These Automations will trigger once a Contact has either Approved or Rejected the Proposal.
When adding Automation for when the Proposal is Approved, you can also select the 'Convert to Invoice'

Invoice settings for the Automation are as follows;

CLICK HERE to learn about Automations
Apply a Template
To load a Proposal Template click the icon shown below.
 A preview of the Proposal Template will be shown along with a Load Template panel. You can choose which Template to apply from the list or search for it in the search field.

You can choose to Keep Current Pages which will add the new Page(s) from the template in addition to the ones already created in the Proposal. Or, you can Reset Current Pages and replace them with the ones in the Template.
CLICK HERE to learn about Proposal Templates
You can also Keep, Reset or choose not to copy the Automations.
Not Copy: means that you are not copying across any of the Automations that were assigned on the template.
Keep: means that you will keep all Automations from both the template and the new Proposal Generator.
Reset: means that any Automations pre-configured on the Generator will be reset and replaced with any Automations assigned on the Template.
To add attachments to the Proposal, click the icon below.

How do I assign a Proposal Generator?
There are several ways you can trigger a Proposal Generator for a Contact.
CRM Options Menu
You can assign a Proposal Generator via a Contact's CRM Options Menu.
Navigate to CRM > Contacts.

Click the Options menu button (3 dots) of the Contact you would like to assign the Generator to and select Proposal Generator.
 A modal will appear in which you can make your selection.

While Creating/Editing a Contact
While creating a new Contact (via manually adding or Kickoff Form), or editing a Contact, you can assign them a Proposal Generator in the process.
For manually adding a Contact navigate to CRM > Contacts and click the +Add Contact button.

This option will appear once you've set the Contact's Role as a Prospect or Client.

Select the Proposal Generator you would like to assign from the dropdown menu.
CLICK HERE to learn about Creating a Contact
Via Kickoff Form
To add via a Kickoff Form navigate to Forms and click the +Create Form button. Select Kickoff Form when prompted.

Set the Role of the Contact as a Prospect or Client.
You can then choose the Proposal Generator from the dropdown menu.

CLICK HERE to learn about Kickoff Forms
How can the Contact view and sign the Proposal outside of the platform?
Once the Proposal is finalized click the Options menu button (3 dots) and select Copy Approve Link.
 This will copy the direct link to your clipboard so that you can send it directly to your Contact. They will not be required to log in to view, sign, or reject it.
Please note that if you view the Proposal from this link it will show as viewed by the client however you can use the 'Mark Unseen' option to reset the document to unseen.

What does the Contact see?
Once the Proposal is finalized, the Contact will receive an email notification. When they log in to the platform they can access the Proposal directly through the Notification Panel or navigate to Office > Proposals to view it.

Just like when you are in Preview Mode the Contact will be able to navigate through the pages by either clicking on the title of each page in the left-hand menu or with the arrows at the bottom of each page.

The Contact can click the Proposals button at any time if they wish to exit without completing the Proposal.
When they reach the Accept & Sign page they will be prompted to either accept and sign the document or they can Reject it.

If the Contact chooses to Reject the Proposal they will be prompted to submit a reason.

How can my Contact download a PDF of their Proposal?
When your Contact views the Proposal they will automatically have the option to View/Print PDF. This button will appear below the Proposal pages.

This button will be available even before they sign the Proposal so they can download and print an unsigned Proposal if desired.
How can I reset an expired Proposal?
In Office > Proposals click the Options menu button and select Reset Proposal.
 You will be prompted to select a new Valid Until date. The current date will automatically be populated but you can click this field and use the Date Picker to select a date in the future if desired.
 You can then immediately resend the updated Proposal by clicking the Reset and Resend button.
If you'd like to create the Proposal in Draft status and edit it before sending click the Edit before Sending button.