
DOCUMENTS: Creating and Managing Documents
What is a Document?
A Document is a written agreement between you and the Contact or Staff/Team (such as a contract/agreement). Instead of having to print it, however, it can be viewed inside of the platform and digitally eSigned.
Documents can currently be created to only be signed by the Contact or Staff/Team, or to be signed by both the Document target and the Organization.
During creation, it can be assigned directly to a Contact or Staff/Team, or you can apply it to an Invoice, Estimate, or Project. to generate corresponding data from those modules.
You can also enable the ability for the user to sign the Document without having to be logged in, and even before a new Prospect or Client is invited into the platform! More information is further below.
How do I create a Document?
In order to create a Document, you must first build a Document Generator to generate it from. A Document Generator is an unassigned Document in which you draft its contents. If you want to apply the Document to an Invoice, Estimate, Proposal, or Project, you'll need to have that item made beforehand too.
CLICK HERE to learn how to create a Document Generator
Once you have your Document Generator built, navigate to Office > Documents, and click the +Add Document button.
 Give your Document a Title. This Title will be visible to the Target it is assigned to.
 You can choose whether you would like to apply the Document to an CRM Contact, Staff member, Invoice, Estimate, Proposal, or Project.This determines the information that the Dynamic Data Placeholders used in the Document Template will generate.
CLICK HERE to learn about Dynamic Data Placeholders
Select a Document Generator from the "Select Generator" dropdown menu. The Generator will then appear underneath this section for you to edit.
TIP: Any option you choose will pull information from different data sets. If you select Contact, it will pull forward placeholders from the CRM however if you select Staff, it will pull forward placeholders from staff Custom Fields. if the Document references a Project, you would want to choose "Projects" so that it knows which Project to generate the data from.
How do I edit or preview the Document?
Once you have selected a Document Generator from the dropdown menu, it will be displayed below. You can view the Document Generator and edit it via the Content Block Editor.
CLICK HERE to learn about the Content Block Editor
When the generator is added, you can still edit the Title and add or remove placeholders. You can also then change the signature requirements, including whether you would like the Document to show in the Urgent Notification Bar.

CLICK HERE to learn about the Urgent Notification Bar.
To the right of the screen there are tabs you can use to Preview, Save as Generator Template, Save as Draft, or Generate the Document.
Before using these tabs, you'll need to fill out the required information (enter a Title, choose a Document Template, and make any necessary selections).
 Click the icon shown above to Preview the Document.

Click the sidebar and click the Text Icon to add your preferred Font details

Click the icon shown above to Save as Draft. You'll be able to edit and generate the Document later.

When you are ready to Generate the Document, click the icon shown above. Before sending, a modal will appear in which you can edit the contents of the notification email that will be sent to the user(s).
 You can customize the default text that appears here in Email Templates.
CLICK HERE to learn about Email Templates

To add attachments to the document click the above icon.
How do I let my users sign Documents without having to log in?
By default, users (both Contacts and Staff) must log in to the platform to sign a Document. However, you can enable a "non-logged" mode so that your users can be linked directly to the Document without having to log in.
Navigate to Office > Settings, then click the Documents tab.
CLICK HERE to learn about Document Settings
 Scroll to the bottom of this page to the Security Settings section.
 Enable the option to allow Documents to be signed without the requirement to log in.
You can also set the link to expire after a certain number of clicks and/or days.
Click this option to copy the link to your clipboard. You can then send the link directly via Secure Messaging or any method outside of the platform.
IMPORTANT: By enabling this setting, you acknowledge that HIPAA compliance cannot be guaranteed. If you are working with sensitive information that is required by law to be privacy compliant, you should NOT enable this setting.
TIP: If you enable this setting and assign a Document to a Prospect or Client in "Not Invited" status, they will still receive the notification email and will be able to sign the Document. This is useful if you require that a Document be signed before a user is invited to register into the platform.
What does the Target see?
The assigned Target will receive an Email Notification informing them of a Document that requires their signature. You can change the default text that appears in this message in Email Templates.
This text will differ depending on whether or not you have enabled the ability to sign a Document without logging in.
CLICK HERE to learn about Email Templates

When the Target clicks the link, they will be prompted to log in and will immediately be redirected to the Document.
If the ability to sign a Document without logging in is enabled, this message will not ask them to log in and will instead link them directly to the Document.
A Notification will also appear in the Contact's Notification Center while logged in.
CLICK HERE to learn about the Notification Center
 Clicking on the Notification will direct them to the Document as well.

The Document will be displayed along with a View/Print PDF button. This can be used before or after it is signed.

Any Signer Placeholders you have implemented will appear as clickable fields. The Target will only be able to interact with Signers that are assigned to them.
 When clicked, a Signature field will open a modal in which the Contact can choose to type out their name which automatically fills in the Sign ePad. Or, they can type their name, and draw their signature separately.
 Some fields, such as for the Signing Date, will populate automatically after a Signature is added to the Document by that user.
 This process is similar for Staff Members when an Organization Signature is required. The email notification they receive is separate for Internals, and can also be customized in Email Templates.
Email Notifications will be sent to the assigned users when it receives a signature, and when it is fully signed.
Both the Notification Email(s) and the PDF version of the Document will include the IP Addresses of each signee.
How do I manage my Documents?
You can manage your Document at any time by navigating to Office > Documents.
 You'll be able to see the Status of each Document at a glance.

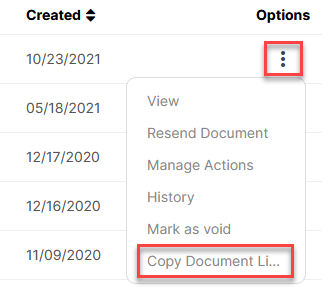
Click the Options menu button for ways to interact with the Document.

View: View the Document.
Edit: This will appear if the Document is in Draft status.
Resend Document: Duplicate the Document so that you can resend it.
Manage Automations: Configure the Automations that are applied to the Document (from the Document Template).
CLICK HERE to learn about Automations
History: See a history of viewing and signature actions taken by the assigned users.
Mark as Void: Remove the Document from the user(s) account, and it will no longer be valid. It will still remain in the list for future reference, but you can delete it afterwards if desired.
Copy Document Link: If you have enabled the ability to sign the Document without logging in, you'll have the option to copy the link to the Document.
IMPORTANT: Once you Void a Document, it cannot be reversed. You will need to generate a new Document.
Once a Document has been marked as Void, you can delete it by clicking the Options menu button and selecting Delete. Note: This cannot be undone.
