
PAGES: Creating a Portal Page
What is a Portal Page?
A Portal Page is a page that can be created, filled with information and resources (images, useful links, etc.), and assigned to Contacts and/or Staff Members. You can use Portal Pages to share information, display announcements, videos, charts, and much more!
Portal Pages can be accessed by any User who is assigned to it. You can assign users by Role, Circle, or individually. Multiple users viewing the Portal Page will see the same thing, except that any Dynamic Data Placeholders used will generate unique, personalized information.
CLICK HERE to learn about Dynamic Data Placeholders
You can also apply prebuilt Portal Page Templates to your Portal Page. More information is in the sections below.
How do I create a Portal Page?
To create a new Portal Page, navigate to Content > Portal Pages and click the + ADD Portal Page.

Page Settings
When you first create a Portal Page it will initially open into the Page Settings area.
 You can click the x to close the settings area and work on your page. These settings can be accessed at anytime by clicking the gear icon when you are editing the page.

You can click the X to close the Settings panel and continue working on your page. You can access these settings at any time by clicking the gear icon while editing the page.
More information about the available settings options is provided later in this article.
Choosing your Edit Type
You will then need to choose which Editor you want to use for this Portal Page. The Content Block Editor is best for most users as it simplifies the creation of rows & columns. The Article Style Editor is most useful when you're mostly formatting text content like an article or blog-style post.

Edit Page Content
CLICK HERE to learn about the Content Block Editor.

You can click the icon shown above to Save the Page at any time.
How do I preview the Page?

To see a preview of the Page, click the icon shown above.
A preview of the Page will appear in a modal. You can switch between how the content will appear on a desktop, tablet, or mobile phone.

You can also choose to preview the Page as a particular user by selecting from the Preview As dropdown menu.
TIP: If you are using Placeholders (including Forms), you will not be able to see the generated data until you preview it as a user.
How do I create a Start Page?
If you want the Portal Page to be the first page a Contact see's when they enter their Portal, you can turn it into a Start page.
Click the following icon to turn your Portal Page into a Start Page.

The Contact will still have the ability to see their Dashboard however the first place they are directed to is the Start Page until the Contact is removed from the start Page settings.
How do I configure Styling Options?
Click the palette icon shown below to configure styling options for the Page.
 Change/Hide the Page Title Bar.
Enabling this setting will allow you to choose one of two options for the Page Title Bar.

The Title Bar is a small strip that extends across the top of a window or tab.

Completely hide the Page Title Bar: This will remove the Page Title Bar from view.
Change the font/colors of the Page Title Bar: This will display the Page Title Bar but will give you the ability to customize the color of the text and background. You can choose the color from a Color Picker for each field.
Change/Hide the Content Card
 Enabling this setting will allow you to choose one of two options for the Content Card. The Content Card is the background behind the content (default white).
Completely Hide the Content Card: This will remove the border around the content you see all throughout the platform.
Change the colors of the Content Card: This will display the Content Card but will give you the ability to customize the color of the text and background. You can choose the color from a Color Picker for each field.
 Change the Color/Pattern of the Primary Background
 Change the Color/Pattern of the Primary Background
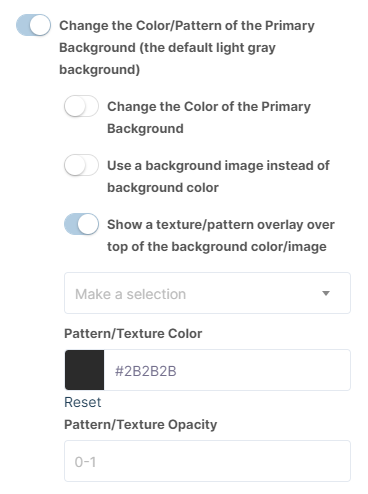
Enabling this setting will allow you to choose one of three options for the Primary Background. The Primary Background is the main background (default light gray).
Change the Color of the Primary Background: If enabled, you'll be able to choose a color with a Color Picker. You can also use the texture/pattern overlay option in addition to this one if desired.
Use a background image instead of a background color: If enabled, you'll be able to choose an image to display with a File Uploader.
Show a texture/pattern overlay over top of the background color/image: If enabled, you'll be able to choose from a selection of patterns along with the pattern color and opacity. You can still set the Primary Background color to be used in conjunction with this option.
Custom CSS/JS
 Advanced users can input their own Custom CSS or Custom JS into this section to further customize your Page.
IMPORTANT: Any configurations you set in Styling Options will NOT be visible in the editor. To see the changes, you should use Preview Mode.
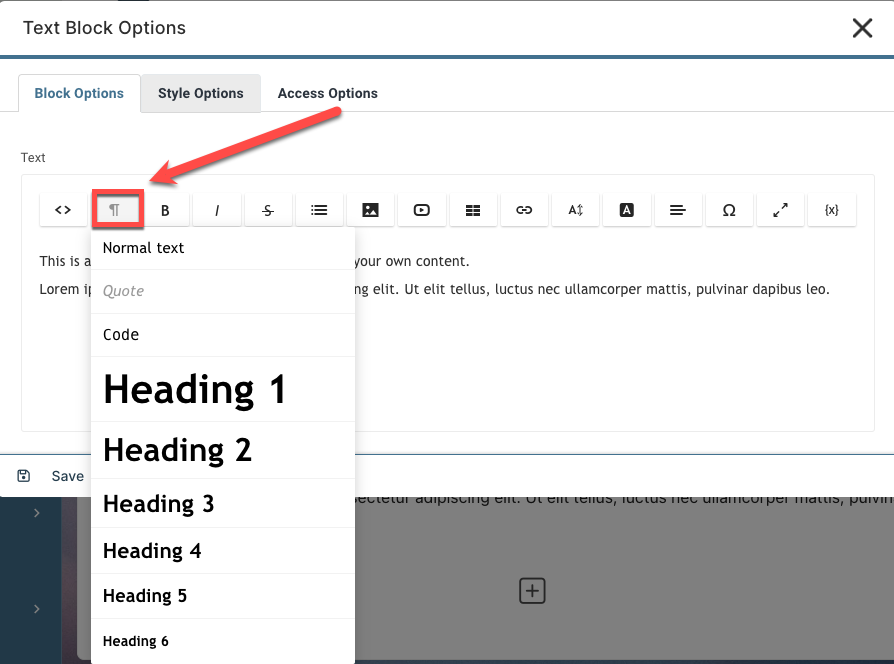
How do I style text?
Using text in your pages, you can choose the text/heading type by clicking the below icon in the text block.
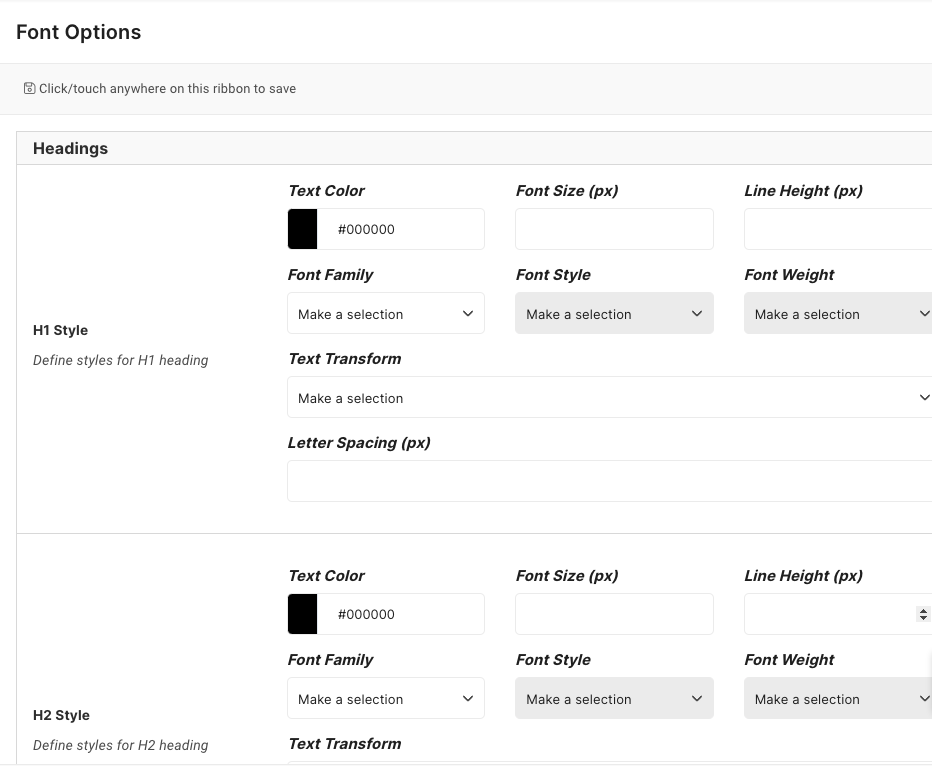
Now go to the sidebar and click theText Icon to add your preferred Font details;

Choose from the list of Google Fonts and select the size, color, weight and letter spacing.
 Please note, you can check your Text/Font by clicking Preview. The Font Styling is not visible when editing the Portal Page.
How do I configure Notification Settings?

Click the icon shown above to configure Notification settings for this Page.

You can choose to send an email notification to all newly-assigned users letting them know they've been given access to this page. This option will not be available if "Allow all logged-in Client(s)/Prospect(s) to access this Page" is checked in the External Assignments section.
You can also choose to send an email notification to all assigned users any time a change is made to the Page.
How do I apply a Portal Page Template?
While creating or editing a Portal Page, you can apply a Portal Page Template with preloaded content, so that you don't have to build the Page from scratch.
CLICK HERE to learn about Portal Page Templates.

Click the icon shown above to select a Portal Page Template to load.
A modal will appear with a preview screen, in which you can choose your Portal Page Template from the dropdown menu at the top.

Once applied, you will be able to continue to edit the Portal Page as normal.
How do I switch between my Portal Pages?
While working on a Portal Page you can easily switch to a different Page by clicking on the dropdown and selecting one from the list. You will see this dropdown on the top right and it will be titled the name of the current Page you are working on. If you are working on a brand new unnamed page the dropdown will be blank.

How do I manage my Portal Pages?
Once you have Pages created, navigate to Pages > Portal Pages and select Manage Pages from the top menu.

Click the Options menu button beside a Page you would like to manage.

Edit: You can edit the assignment details, menu display, and Editor content, exactly as when you were creating the Page.
Preview: Preview the Page (with the Placeholder tags showing).
Copy link: This will copy the page link to your clipboard.
Assign a Start Page: Select this option to automatically direct the user to this Page when they log in. It will bring up a window in which you can choose users and/or Circles from the respective dropdown menus.
CLICK HERE to learn about Start Pages.
Save as Template: You can save the content as a Portal Page Template, which you can use to apply to other Pages.
CLICK HERE to learn about Portal Page Templates.
Duplicate: Create a copy of the Page. Clicking this option will automatically direct you to the Editing screen of the copy.
Make Dashboard: Add this Page to your list of available Dashboards.
CLICK HERE to learn about Dynamic Dashboards
Delete: Remove the Page from the platform. Note: This cannot be undone.
How do I update the Visibility Settings?
Go to Content > Portal Pages > Manage Pages > Settings. You can now choose which Staff Members will be able to access Manage Pages.

You can choose to designate access to Manage Pages based on Role, Individual User, or Team.

How do I change the order of my Pages in the Menu?
Navigate to Content > Portal Pages and select Page Order from the top menu.

Click the Menu Group you would like to rearrange and click and drag the Menu Items to your desired order.

TIP: If you want to change the order of the Page Categories in the main menu, you can do this from Flyout Menu > Content Categories.
CLICK HERE to learn about Content Categories.
What does the Contact See?
Role-based permissions do not apply to the Dynamic Pages Menu. The Dynamic Pages Menu (DPM) is automatically built "on the fly" each time a user logs into the platform. It is automatically populated with only the Portal Pages that the logged-in user has permission to view, and that is the reason you are not able to set the visibility using Custom Menus. If the logged-in user has not been assigned to any Portal Pages, then this "Pages" menu item will not show at all to that particular user.
From Custom Menus, you can control where this menu item is placed, and you can change the label of the menu item.
You can manage whether or not Portal Pages show in the DPM from the assignments area of the appropriate Portal Page(s).
Page Title: The full title that your Contact will see while viewing the Page. This is not to be confused with the Menu Title, which is how it is named in the Menu.
Menu Title: This is the name of the Sub-Level Menu Item that when clicked, will bring your Contact to this page. For example, if we name this Menu Title "Product A" and we've named the Menu Group from earlier "Account," your Contact will navigate to Pages > Account > Product A.
IMPORTANT: The Client-side Pages menu is Auto-Generated and Auto-Organized based on the Admin's configured settings. If a Client does not have Portal Pages assigned, then they WILL NOT see the Pages menu in their navigation.
 Content functions as a Top-Level Menu Item just as it does for Staff. However, the nested Sub-Level Items will be what you specified as the Category / Menu Group and the Menu Title of the Portal Page.
How do I change "Content" to something else?
Most menu item names can be changed with Custom Menus. However, changing the name for Content will only change it for the Staff-side.
To change "Content" on the Staff side, navigate to Flyout Menu > Custom Menus.
CLICK HERE to learn about Custom Menus

Click the icon and input the desired name.
To change the "Content" menu item name for Contacts, you'll need to use our Translations tool.
Navigate to Flyout Menu > Translations (beta).
CLICK HERE to learn about Translations

Enable Translations, then type "content" in the search field. Check the Hide Empty Groups box for an easier search.

The following is where the Pages menu label is located.

Page Settings
When you first create a Portal Page it will initially open into the Page Settings area.

General page Assignments & Details
Assign Contact(s) to grant access to view this Portal page. If you would like to grant access to all Prospects and Clients, you can check the check box at the top of this subsection.

You can assign individual Contacts or all users in a Circle.
You can quickly create a Circle by clicking +Add Circle.
CLICK HERE to learn about Circles
Assign Staff Member(s) to view this Portal Page. If you would like to grant access to all Internal users, you can check the box at the top of this subsection.

You can assign individual Staff Members or all users in a Team.
CLICK HERE to learn about Teams
Configure Dynamic Menu

A category/menu group is a required field, and the target will see this group when navigating pages in the My Pages menu.
 Toggling this option will hide the Page in the 'My Pages' dynamic menu. Alternative ways to show the page would be through a button, as a Start Page or as an Individual Menu Item created in Flyout>Custom Menus.
 Page and Menu titles are also required. the Page title will be the actual title and it will show at the top of the page. The Menu title will be visible if the Target has option to access the page via the 'my pages' dynamic menu item.
What is the Page display setting?

Every Portal Page now has a Page display setting that controls how much of the platform's interface wraps around the page. You can render a private Portal Page full-screen, with no top bar and no sidebar, while the user stays logged in, so private blocks like My Tasks keep working with each person's own data.
There are three options:
- Standard: the page renders exactly as it always has, inside the full app shell with the top bar, left sidebar, and back bar. This is the default.

- Focus: hides the top bar and the left sidebar so the content fills the screen, while keeping a back arrow as an easy way out.

- Bare: a full kiosk view. Every bit of interface is removed and the content runs edge to edge, with no built-in way to navigate away.

Previously, getting a Portal Page to display chrome-free required a brittle workaround that fought the platform's layout, and private blocks could not reliably come along. This setting replaces that with a clean, supported choice right in the page editor settings.
How do I set a page to Focus or Bare?
Open the Portal Page in the editor and find the Page display setting. Choose Standard, Focus, or Bare, then save. The choice is saved per page, so different pages can use different modes.

Because the user stays authenticated in every mode, the page renders full-bleed without losing the logged-in context. The display is responsive and adapts to screen size with no fixed width.
TIP: Choose Focus when you want a clean, distraction-free page but still want users to be able to step back into their Portal. Choose Bare for a true kiosk or embedded-style experience where no navigation should appear at all.
What should I watch out for with Bare mode?
A Bare page has no top bar, no sidebar, and no back bar, which means there is no built-in way for a user to navigate away from it. That is intentional for kiosk-style pages, but it is worth keeping in mind when you decide where a Bare page sits in the user's journey.
IMPORTANT: If you set a Bare page as a user's login start page, they would land on it with no way back. SuiteDash shows a non-blocking warning in this situation so you are aware of it. You can still proceed if that is what you intend. Focus pages do not trigger this warning, since they keep the back arrow.
Do my existing pages change?
No. Every existing Portal Page stays exactly as it was. The default for every page is Standard, which renders identically to before, so nothing changes until you deliberately opt to change the page into Focus or Bare. No admin action is required.